Wednesday, March 30, 2016

A Poultry Take on Swedish Meatballs


My Tips & Short Cuts to Ease the Meatball Making Process

Making any meatball recipe, from scratch, is a labor of love.  I equate it to puppy love; falling hard and strong in the beginning, and then slowly realizing that what you have gotten yourself into is going to require a bit more work than you had hoped for.  Swedish meatballs are no exception to this rule.  The ingredient list is short and simple, but I quickly realize why it has been 3 years since I last made the recipe.

In defense of the process, I likely make it more difficult on myself as I have a motto about cooking: "If I am going to dirty dishes then it will be worth it, and I will get a minimum of four meals out of it!"  I double, triple, and quadruple recipes so that I have plenty to freeze.  Doubling my recipe meant that I had 120 meatballs to scoop, brown, and simmer.

Having made quite a few meatballs, Swedish and other, I have picked up a few tricks along the way.  Let me walk you through my process and share my lessons learned.


The recipe I use calls for grated onion.  There is no shortcut here, other than a good old-fashioned cheese grater.  I prefer to cut the onions in half, peel off the outer skin, and then grate the same way you would a block of cheese.


Day old sandwich bread is best.  Tip: Sharp knife!  You can use a bread knife, but the bread knife does cause the bread to shred, leaving a lot of crumbs behind.  Use a very sharp straight-edge knife to have far less crumbs and waste.


I prefer to grind my own meat.  I have an attachment for my stand mixer, but there are various stand-alone grinders available at any kitchen store.  To me, this is a lean chicken breast - virtually no fat at all.  (And yes, that is chicken and not turkey.  I am questioning my organic meat providers as this is surely not a normal-sized bird).


I favor a more coarse grind for meatballs.  It helps the meatball retain some texture, and makes the conditions less favorable for over-mixing the meat as you can quickly incorporate ingredients into a thicker ground product.


Whole nutmeg, freshly ground, will change your mind about nutmeg completely.  I have tried grinding my own cinnamon, allspice, and dried ginger - the variance between pre-ground and freshly-ground is detectable but slight.  Nutmeg is a completely different spice when ground freshly.  Tip: Whole nutmeg is very affordable at International Markets. I paid $3 for a 3.5 oz bag that had approximately 20 whole nutmeg.


Tip: Quick mixing. When adding your spices to the ground meat, sprinkle them out evenly across the bowl.  This will allow for easier incorporation into the final product.


Often savory recipes are considered to be more of a guide than an exact science.  My recipe proportions, along with the specific brands of products I used, did not provide for complete absorption of the milk.  I just poured the excess moisture off before proceeding to the next step.


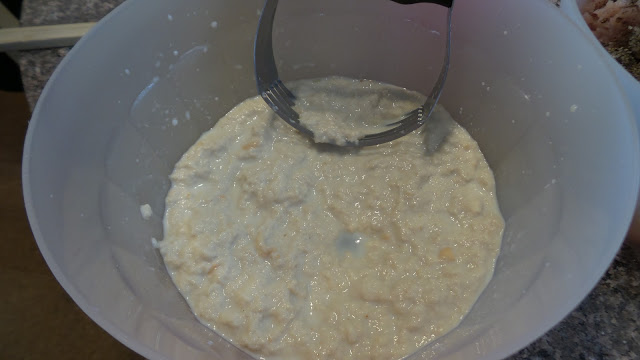
Tip: Food processor options.  Food processors are very useful kitchen tools.  So useful that some recipes call for them when they really are not needed.  My recipe calls for the bread/milk mixture to be pulverized in a food processor, I opted for my trusty hand tool - the pastry cutter.


Tip: Unless a recipe specifically states "whole eggs" assume you can scramble them.  I should have scrambled my eggs before adding them to the bowl.  As I did not, extra time was required to break the yolks and make sure that everything was evenly incorporated.


The meatball mixture will be moist, almost soggy.  It should be combined to the point where it will just hold together on its own, but not hold a firm and perfect circular shape.  If it is too lose then add a bit of bread crumbs, a few tablespoons at a time, and mix until the right consistency is achieved.


Tip: Water is your best friend when handling raw ground meat.  I keep a spray bottle handy for any surface, including my hands, that will come in contact with raw ground meat.  The meat does not stick to the water, which makes for easier handling.  Be sure to refresh the water spray on your hands frequently.


Tip: Use an ice cream scoop.  No need to roll and fuss with the shape, just scoop out uniformed sized balls onto a tray.  It goes quickly!  I used a 2 Tbsp size ice cream scoop.

To expedite the process, I prefer to scoop out enough meatballs to fill my cooking pan 3 times.  Each round of meatballs takes approximately 5 - 7 minutes to brown completely.  I use that down time to scoop the remaining meatball mixture onto my baking tray.


Everything is better with Butter, so they say.  I can usually take or leave it.  In fact, I often substitute various oils in place of it.  But, when it comes to making Swedish Meatballs you should stick with the full-fat golden stick of deliciousness that is butter.  The browned butter is a major contributor to the rich taste of the final product.


Do not crowd the pan!  We hear that often, but seriously - do not do it.  Leave enough space to properly flip each meatball, without the danger of sending sizzling butter/fat splashing about.

Tip: Expedite by adding a second pan.  Browning in two pans at once is the way to go.  Your cooking time will be much faster, and you are only adding one additional dish to the clean up.


Tip: Use an insulated and covered vessel to hold your partially cooked product.  The meatballs will be browned, but not cooked through.  This recipe calls for them to finish the cooking process in a sauce.  The colder the meatballs are allowed to get, the longer it will take them to come back to temperature and then progress to a completely cooked temperature.  I like my cast iron dutch oven, but any covered dish will do (Pyrex, another pot, etc...).


Tip: Do not be too fussy about the shape of the meat "ball."  The recipe calls for the meatballs to be browned on all sides, but rotating a sphere in order to get a 360-degree brown is a bit more than I am willing to commit to.  These meatballs are more likely to flatten on the first side that cooks.  It was easier for me to just flip them, 180-degrees, and give them a little push downward to complete a meat "disk" rather than a "ball."  This method requires browning on only 2 sides, rather than the full 360-degrees.


Tip: Maggie Chicken Cubes!  When it comes to chicken stock I have been holding back a little secret from my friends and family.  These delightful little cubes are concentrated bombs of deliciousness.  I first found them at an international grocery store, but I have seen them in my local big box stores as well.

There are two versions:  The original version can be found at Walmart, in the international foods isle closest to the Hispanic food section.  The Arabic/Halal version (which tastes identical to the original) is available on Amazon, for less than 1/2 of the price.  


Tip: Melt multiple cubes in 1 cup of water first.  Making stock from Maggie cubes is a simple formula of 2 cups of water per 1 cube.  In a situation where I am going to use more than 2 cups of stock, I put all of my cubes into 1 cup of water.  That goes into the microwave, on high for approximately 3 minutes.  I stir the mixture until all of the cubes dissolve, and then I add the remaining water.

Microwaving 1 cup of water is faster, and safer, than working with 8 cups of hot water at once.

The remnants in the pan just after browning the last batch of meatballs.
Tip: Silicone coated tongs make a great instrument for stirring.  I prefer to minimize the after-cook dish duty, so I look for items that will multi-task well.  Silicone tongs are excellent for stirring and whisking sauces in a hot pan.

Tip: More sauce please!  If you have a sauce hungry family, like mine, then consider making the sauce to 1.5 times the recipe.


Tip: Sprinkle the flour evenly across the pan to avoid lumps.  I did not heed my own advice, and dumped my flour in.  I spent an extra few minutes whisking/stirring out the clumps.


Once the flour has been completely dissolved, cook the mixture until it becomes the color of coffee with creamer.


Slowly incorporate the chicken stock, and stir until the sauce becomes a lightly thick gravy.  Return the meatballs to the pot, cover, and simmer until the meatballs are cooked through (approximately 20 minutes).

Tip: Freeze Here!  If you have made excess, with the intention of  putting it in the freezer for a later date, this is the point in the process to do that.  Allow the product to cool and package accordingly.  Reheating can be done in the microwave, stove top, or slow cooker.

You could freeze once the sour cream has been added, but my experience has shown that the sour cream tends to separate from the sauce once frozen and reheated. It still tastes great, just looks a little different.


 Were you aware that sour cream comes in a squeeze pouch now?  I just discovered this.  Thanks Daisy!
 

Once the meatballs are cooked, you are in the home stretch.  The table should be set, the beverages poured, and napkins in laps.  All that remains is stirring in the sour cream.


Voila!  Swedish-style Meatballs.  A hearty portion is approximately 5 meatballs, so you should have 12 servings in the pan.  That should do for a few nights of dinner.


If you cannot make it to ikea for some Lingonberry Preserves, canned cranberries will do.


A hearty portion or decadent and rich food.  It is a shame that I managed to overcook the peas, but they were still delicious!  Had I not intended on photographing my dinner, the peas would have been perfect.  Go figure!


Delicate, decadent, moist, and delicious.  If someone had tried to convince me that chicken, bread, milk, allspice, and nutmeg made the most delicious meatballs I would have called them crazy.  They are a wonderful addition to a holiday menu, and often the feature of our Easter meal.

The full, and printable, recipe is here.


Doing A Dollop of Daisy Has Been Streamlined


This could be filed under a whole host of hashtags:
#WhyDidThisNotExistBefore, #SomeOneDeservesARaise, #DollopWithoutMess, #DaisyWinning, #CondimentRevolution, #DaisyEverythingNow, #NoMoreWaterResidue, #Yummmmm

Ok, you get the idea.

I sent my husband on a last-minute grocery run.  He came running into the kitchen with the excitement of a child who had received their first honor roll report card.  We marveled in the simplicity of the concept, and wondered why it had not been done sooner.

The slim profile takes up less
shelf space.

A clean squeeze cap leaves little residue after use.  This is going to be a staple
on our family taco bar.

I am most excited about not having to navigate the milky water substance
that forms on top of the carton.  It may for on the top now, but the top is the
last of the supply and I will deal with that when we get to the end.


Swedish Meatballs (Chicken Version)

Recipe Yields approximately 60 meatballs.
Best served with Lingonberry or Cranberry Jam/Jelly

Meatball Ingredients
1  Large Yellow Onion, peeled and grated (a standard cheese grater will do)
2 Tbsp Butter or oil of choice
2/3 cup Milk
4-5 Slices White Sandwich Bread (remove the crust and cut bread into small pieces)
2  Eggs
2  Lbs Lean White Chicken Breast, Ground
2  tsp Salt
1 tsp Ground Nutmeg (fresh preferred)
1 tsp Allspice
2 tsp Black Pepper, ground

Sauce Ingredients
6 Tbsp Butter (no oil substitute here)
1/3 cup Flour (all purpose)
4 cups Chicken Stock
3/4 cup Sour Cream
Salt to taste (depending on chicken stock salt levels)

Instructions

  1. Saute the grated onion in butter/oil over medium heat, until soft and translucent.  Remove and let cool.
  2. In a medium bowl, mix the bread pieces and milk.  Let stand for 15-20 minutes, allowing the bread to soak up the milk.  Once the bread has absorbed the milk, pulverize the mixture in a food processor or use a pastry cutter to break into the smallest possible pieces (If there is an excess of milk, drain and discard the excess milk prior to pulverizing). 
  3. Place the ground chicken into a large bowl and add the cooled onions, bread/milk mixture, and remaining meatball ingredients.  Mix until all ingredients are well incorporated. If the mixture seems too wet to form a ball then add plain bread crumbs, mixing in a little at a time until you have a consistency that will hold shape. 
  4. While your skillet is preheating, on medium heat, line a baking tray with aluminum foil and spritz it with water.  Use a 2 Tbsp Ice Cream Scoop to portion out  the meatballs onto the tray.
  5. Add 6 Tbsp of butter to the preheated pan.  Once melted, place meatballs into the pan to begin browning.  Mist your hand with water to keep the meatballs from sticking to your hands.  Brown the meatballs on each side, and then remove to a holding area while browning the remaining meatballs.
  6. After all meatballs have been browned and moved to a holding area, prepare your pan for the sauce by ensuring the butter is not burnt.  If it tastes burnt, remove it and replace with 6 Tbsp of fresh butter.  If your butter is low, add additional butter to compensate. 
  7. Add the 1/3 cup of flour to the butter and stir to make a roux.  Cook the roux until it is a milky-brown color (coffee with creamer).  While the roux is cooking, warm the chicken stock. 
  8. Once the roux has reached color, slowly pour in the stock.  The roux will seize up and become thick, just keep stirring and pouring.  Stir until all of the lumps are dissolved and all of the broth has been added. 
  9. Return the meatballs to the pot with the sauce and simmer until the meatballs are cooked through completely (approximately 15 minutes, depending on how cold the meatballs are).  
  10. Once the meatballs are cooked through, add the Sour Cream and stir until completely incorporated. 

I recommend serving with mashed potatoes and Lingonberry or Cranberry Jam/Jelly.


Tuesday, March 29, 2016

Product Review Weekly Wrap-Up March 21-27

I have thoroughly enjoyed writing product reviews.  As I mentioned in a previous post, it allows me to indulge in my shopping desires as well as entertain my writing whims.  I thought that I would share my review experience, week-by-week, by providing a recap of the products that I have reviewed.  This is not a list of all of the products that have arrived this week, as many still need to be tested, just the ones that I made time to review.

I am providing links to my reviews.  Once on the review page, you will find a link to the product page in the far right corner.

Want to know about becoming a product reviewer?  I have detailed my experiences in this post.


The Retail Value of the items I wrote reviews for this week was $303.74
My out-of-pocket cost for these items was $15.10


March 22nd
The week started off with some fun stuff for the little ones in the family.  Ice cream season is upon us, and these little scoops made that treat a bit easier (not to mention eliminating the added expense and calories of a cone).

I previously purchased some skid-resistant socks for a little lady in the family.  When the opportunity came up to test the version for little boys I was happy to pass on a set to her brother as well.

I am a doer - I see something and instantly think "I can do that."  Usually I try, and sometimes I succeed.  Success often has a lot to do with the materials.  I have seen little artists face painting at countless family events, now I can do it at my own family events thanks to this set of face paints.

Not all Selfie Sticks are created equally!  This was the product that taught me that lesson.

Sleep masks are my new obsession.  I purchased this one for me, and I have purchased more to give to everyone I know as I now cannot imagine life without one.

USB chargers are always a welcome sight in our home, and the homes of our friends and family.  I will have no problem finding a home for a charger that supports both Apple and Android products.

Oh Matcha Powder, how I love thee!

Allergy season is upon us, these air filters were a no-brainer.


March 23rd
A girl can never have enough skin care products.  This face cream came just in time for the spring/summer dry skin season.

The sleep mask was such a hit that my husband decided to confiscate the first one I reviewed.  Little did he know I had this as a back up.  It worked out in my favor, as this was a much kinder version for my longer eyelashes.

I am determined to put together gift baskets for each of my friend's phones.  A case, screen protector, and car charger for each.  This car charger has already been claimed, and for good reason.

In addition to the aforementioned items in the phone gift baskets, I am hoping to have phone arm band cases as well.  This was a good one to start off my collection.

The Wild company may have made me a customer for life.  I have tried their cocoa nibs, and loved them.  Now I have the cocoa butter as well.

We have been reusing our straws for years.  Now we own straws that were actually meant to be reused.  These stainless steel smoothie straws lived up to their description, and are a welcomed addition to our kitchen.

As I mentioned before, not all selfie sticks are created equally.

Tempered glass is the bell of the screen protector ball right now.  I admit, applying this screen protector seems daunting due to the size.


March 25th
Yay!  More Matcha!!!

Now that each of us have a sleep mask, we can start collecting some for our gifting drawers.  This sleep mask will likely be coveted.

I really enjoy reviewing pretty things.  This set of brooches was the prettiest so far.


March 26th
I requested this set of silicone covers with someone very specific in mind.  Now that I have tested, and experienced them in use, I want a set for myself.

We have some little ones in the family. In their own cars, they have all of the creature comforts.  When they travel in one of our cars they cannot understand why we do not have...  One item I am determined to provide all of our family vehicles is cling on sunshades.

I am amazed at how sellers can shoot themselves in the foot.  Do not lie about the product.  If it is not quiet, then just leave it at "it sharpens."  This pencil sharpener was billed as quiet, I added video to show that it is not.

Saturday, March 26, 2016

The Optical Illusion of Cookie Decorating, Easter Edition


I have pinned over 400 cookie designs to my Cookie Decorating Board on Pinterest.  Each one is a photo of a seemingly perfect cookie, dressed in straight lines and perfect curves, and not a swirl of icing out of place.  I wish that my hands were that steady, but they are not and never have been.

I have managed to perfect, what I refer to as, the Optical Illusion Decorating Technique.  

Before we get into the details of this decorating trickery, I have one additional tidbit of decorating advice to share.  I prefer to decorate my cookies in layers.

I base coat all of the cookies at once.  I come back and add the decorative elements (by color) to all of the cookies, and then the next color, and so on.  This will make more sense as you read below, but do trust that it will save time.  You quickly gain muscle memory and find that transitioning from cookie to cookie will move along more quickly.

You will also notice that I am decorating on the tray, and have the cookie rows upside down to one another.  I prefer to create an assembly line of trays, and decorate one row at a time.  Once the row is done, I flip the tray 180-degrees and repeat the decorating process.  As a tray is complete, I move it out of the way and repeat the process with the next tray.


The Optical Illusion


The tray, in the above photo, is full of white frosted bunnies.  The imperfections are glaringly obvious - the lines are not completely straight, the corners are a bit rough, and I did not flatten the edges where I lifted my decorating tip.  No worries, I promise to distract your eyes from this in the subsequent steps.


Starting with pink icing; the nose, tail, and inner ears are piped on.  I like to work my details from the inside of the cookie, coming out.  This way I will not have to worry about accidentally dragging my icing tip through any outer details.


Blue icing, only a small dot for each eye.  You are already becoming distracted by the bunny taking form, and less conscious of the imperfections.


The most impactful portion of the illusion is the outline.  The outline is the opportunity to further define the shape.  Neither the base coat nor the outline are perfect in form, but together they almost cancel one another out.  You are not drawn to the imperfect base layer, or caught by the imperfect outline.


As an additional measure of illusion, I like to add a focal point that will draw the eyes away from the areas most likely to be "rough."


In this case, the sugar pearl necklace pulls the eye into the center of the cookie and away from the outer edges.


My cookie plaques were the best example of my optical illusion technique at work, as my writing skills are inconsistent at best.  My writing was added to the cookies as the first step, this allowed me to adjust where the outline would fall so that my writing would appear centered.  Prior to adding the outline, I added the floral accent to the left and right sides.  This provided a break in the outline and further illusion that my plaque was centered - when it absolutely is not.


Outline and edible glitter are easy ways to add depth and dimension to your finished cookies.  I apply my base coats and let them set to a hard state.  Once hard, I dry brush edible glitter on the base as I did not want it on my outline.  Applying the outline and adding some leaf detail were the final steps that created a polished-looking carrot cookie.


The Icing

A key to mastering the Optical Illusion Decorating Technique is having a good royal icing recipe. When decorating cookies you will need two consistencies: Stiff Peak & Flow.


Stiff Peak is the stage where the icing will leave stiff peaks when the spatula is lifted from the icing.
Flow is a state where the icing is more fluid and will flow slowly, like lava, when applied.

You will use the stiff peak icing to create the outline of your base-coat, and then fill it in with flow icing.  You will add all of the decorative elements in the stiff peak consistency.


Friday, March 25, 2016

A Multi-Cultural Easter


We are a multi-cultural family. My husband's ethnic background is the easiest to explain, he grew up in the U.S. but was born in the Caribbean (Trinidad).  His parents migrated from India.  The cuisine that makes up his family traditions has a strong root in India, with a British island flare.

My ethnic composition is a bit more all-over-the-place.  I was raised in Texas, my mom grew up in Michigan, and her parents were from Canada and the Midwestern U.S.  A recent DNA test revealed that I have strong roots in Scandinavia, Africa, Western Europe, Ireland, and Italy/Greece.  The food of my childhood reflects quite a bit of these cuisines.

I was raised in a family that was naturally curious when it came to culinary creations.  I recall special dinners of recipes from all around the globe.  It was not a frequent event, but often enough to spark my interest in trying new things.

Not only do my husband and I have different cultural backgrounds, but we follow different religions.  The benefit of this situation is that there is no compromising on major holidays, as we each indulge in the traditions of the other's special day.

We have managed to avoid situations like the great stuffing debate that has plagued my family for decades.  Our family tradition incorporates a northern-style stuffing into holiday meals.  My aunt married a Southerner who cannot imagine a holiday without cornbread dressing doused in giblet gravy.  This has been cause for much discussion over the years.

Occasionally my husband I find ways to incorporate our cultural practices into the other's events.  I have made countless specialty cakes for his big holidays, and now we have a adopted the practice of bringing in a traditional Indian sweet into our observation of Easter.

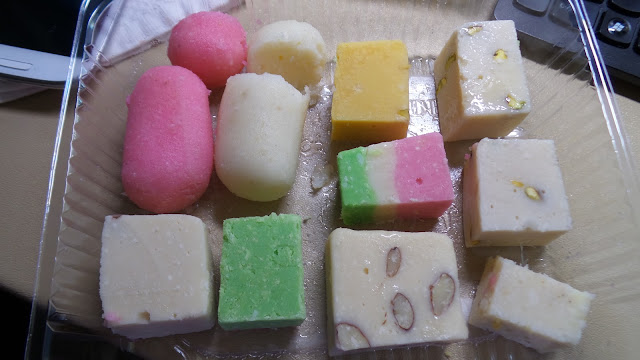
Our package of Mithai for Easter 2016.  The colors are perfectly spring.

Mithai is a term used to describe a a collection of sweets.  The word is Hindi in origin, but is used in cultures all across Asia.  These sweets are usually of the India-origin variety, and a mix of  Burfi (also spelled Barfi and Barfee) and Gulab Jamun.

Left (green) Plain Burfi (milk solids, coloring, and sugar).  Center is Almond Burfi (milk solids, sugar, almond essence, sliced almonds). Bottom Right is Cardamom Burfi (milk solids with ground cardamom and sugar).  Top Right is Pistachio (milk solids, sugar, pistachio pieces).  Top Center is a tricolor Plain Burfi (milk solids, coloring, and sugar). 

Burfi is a fudge-like sweet that is made from some form of milk solid (powdered milk or milk curd in the form of paneer or ricotta).  Boiled sugar is added to the milk solid to create the texture, and then flavorings such as cardamom and/or nuts are added.  Burfi is typically adorned with gold or silver foil and is a big part of most Indian celebrations.

Plain Burfi Platter, adorned with edible silver foil.  Festively perfect for any holiday. 

Other varieties of Burfi can include ingredients like chocolate, mango, rose water, and dried fruits.  Add-in and flavor varieties vary by region, religion, event, and culture.

Pictured in the center (orange color) is Mango Burfi.

The base recipe for Gulab Jamun calls for paneer (milk curd) to be molded and deep fried.  After the frying process the product is boiled in a sugar water solution.  Other varieties include coconut (added to the paneer), a flour-based dough, and a chickpea flour version.  Coloring can be added to any of the varieties.

Coconut Gulab Jamun is made from Paneer and Unsweetened Coconut that have been formed into a log and deep fried, then boiled in a solution of sugar water with cardamom pods for flavoring. 

Fancier versions of Gulab Jamun can incorporate a cream filling, by splitting the sweet in half and piping in a creamy center. 

The sweets in a Mithai packages are not only delicious, but stunningly beautiful to look at.  There are various form factors including blocks (as seen in my package of Mithai), rolls, fancy geometric shapes, object shapes (fruits of flowers), and adorned with decorative elements.


 The next time you find yourself passing by an ethnic market, consider wondering in and asking for the Mithai.  Many stores will sell mixed packaging, but some offer it by the piece.

There are many more Indian sweets varieties, beyond Burfi and Gulab Jamun.  This article on Wikipedia is a great starting point for understanding the origin, options, and ingredients.

A common thread in many Indian Sweets is the lack of wheat flour, which makes Indian sweets a pot of gold for those who are gluten sensitive.